Preparing Images for the Web with Photoshop
Introduction
1. Digitise Your ImageIf you would like to contribute to this wiki, you will need to be able to edit your images in a picture editing program. There are a number of possible image editing programs that could be used. This page is a tutorial on simple picture editing using Photoshop CS3. Photoshop is a complex program but can be used at a very simple level as shown below.
source : <a class="external" href="http://www.theage.com.au/ffximage/2004/11/19/icon_lumix3_nov20,0.jpg" rel="nofollow" target="_blank">http://www.theage.com.au/ffximage/2004/11/19/icon_lumix3_nov20,0.jpg</a>There are two commonly used methods for digitising a transparent film image. The first method is to use a commercial digitising machine. These machines produce high quality images. The second method is to use a digital camera mounted on a tripod and the image mounted on a viewing box. It is worth taking a few exposures with your camera at different density settings. The results with a good quality digital camera are very acceptable.
Most of the radiographic images that I have used in this website (that were not already in digital formats) were digitised with a Panasonic Lumix FZ 20 (left). The results I have found to be more than acceptable. I have tried digitising radiographic images with an expensive quality digital SLR at 13 megapixels and could not see an improvement in image quality.
I use the camera's auto-bracketing function to produce three images: one at the cameras ideal exposure; one slightly underexposed; and one slightly overexposed.

2. Open Photoshop
It is assumed that the program Photoshop is installed on your computer. When you open Photoshop you will see a blank workspace as shown below.

3. Open Your Image
It is assumed that your image is digitised and loaded on your computer.
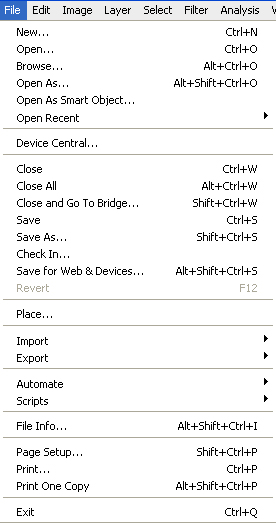
Click on the File pull-down menu and then click on Open.
Click on the image file you wish to edit in photoshopYour image will appear in the workspace as shown left


4. Convert to Grayscale
The rest of this tutorial will refer to image manipulations of the image shown above.
Before you start working on your images, covert them to a grayscale image. You will find that your images will have slightly different hues and they can detract from your presentations. You will find X-ray images on the internet that have a slight colour to them and they can look horrid.
Click on Image, Mode, then Grayscale (sic) as shown
Note that if you require color in your image you will have to convert it back to RGB at a later stage in the editing process.

5. Rotate Your Image
Next rotate your image clock wise by clicking on Image, then click on Rotate Canvas and then click on 90CW. This will rotate your image 90 degrees clockwise. If you image needs further rotation click on the word Arbitrary and enter the number of degrees of rotation that you require.

6. Crop Your image and Remove Patient Information
We have two CT images and we only want one. To remove the other image select the Crop tool and drag a box around the image you require to keep. Once you have done this, select the Enter key on your keyboard. If you make a mistake, click on the Edit drop-down menu and then click on go backward. If you have made several mistakes you can keep going backwards. This is a very useful feature of Photoshop
It is the policy of this website to remove images that contain patient information. To remove all text from this image we will use the clone tool. Click on the clone tool
The little arrow next to the Brush: text is a
pull-down menu. This will open up as shown to the left. Select the brush type and diameter that you think you will need.
You are now going to copy a black part of the image and paste it over the text.
Select an area of black in the CT image. This is achieved by positioning the clone brush shape over a suitable area of the image, hold down the Alt key on the keyboard, then click the clone tool shape over the text you which you wish to hide.
Keep repeating this process until you have removed all of the text.
Note that you could achieve the same result by using the paint brush tool. The advantage of using the clone tool is that you use the same shade of black as the rest of the image.


7. Resize Your Image

The image needs to be resized. It is much better to resize the image in Photoshop than to use the resize function from the wiki easy edit tools. The image below will give you some idea how large your image will appear on the screen at different pixel dimensions Clearly, any image that has a dimension of 800 pixels (vertically or horizontally) is very large and should only be used in special circumstances. Images that are 400 x 400 pixels or 600 x 600 pixels are more suitably sized. To resize your image click on the Image drop-down-menu then click on Image size. The Image Size palette will appear on your screen as shown left. It is important to select Constrain Proportions and Resample Image.Note: for consistency and asethetics it is worthwhile keeping your images the same width. If you are placing them across the page keep them at the same height.
Set the resolution at 72 pixels per inch (this is the screen resolution of a PC). Then click your cursor in the width or height box and enter your preferred dimensions. Because you have selected to Constrain Proportions, you will only be able to set either the width or height. When you are finished click on OK.


8. View Actual Pixels
It is useful at this stage to see your image as it will appear in the wiki. To achieve this click on the View pull-down menu and then click on Actual Pixels

9. Set Levels
There are a number of image manipulation changes you can make at this point. The Brightness/Contrast and Shadow/Highlight functions are particularly useful. Perform a few test manipulations- if you're not happy with the result, you can undo the changes as described above on this page. You could also try the auto functions (rarely satifactory for medical images) or, if you want complete control, use the Levels function If you want to lighten or darken use the Dodge Tool or Burn tool respectively

10. Sharpen Your Image
Sharpen Filter x 0 Sharpen Filter x 1 Sharpen Filter x 2


Your image has undergone a number of processes starting with the initial image you created with you digital camera, and finishing with the resizing. Along the way it has lost some sharpness. This can be restored using the sharpen filter. The images below have been resized smaller so that they will fit across the page. They have been filtered once then twice. Be careful not to over-filter, especially if you are using a CRT screen- the images will appear sharper on an LCD screen. You can achieve a softer mor controlled sharpening using the Unsharp mask filter

To use the Sharpen filter click on the filter pull down menu and then click on Filter. If you over-filter just Step Backward.

11. Save for the Web
It's time to save your image to the hard drive on your computer. As with everything else in Photoshop, there are a few tricks involved. It is useful to save your image twice.
Firstly, click on the File pull down menu and click on Save. A new window will appear in which you can alter a few parameters. Make sure the file type is PSD. If you need to go back to the image for any reason this is the file you will open.
Secondly, click on the File pull down menu and then click on Save for Web and Devices. This is a very useful feature in photoshop in which you can save the file in a JPG format that is optimised for the web. Try to keep the image under 100k. Use the quality slider to reduce the file size if needed.

11. Fair Dealing
The question arises as to whether you are misrepresenting your image by manipulating it in Photoshop. Your objectives are to present the image in a manner that fairly reflects the original. There are also a number of other fair uses of photoshop as follows
- convert image to greyscale
- resize image for the web page
- label structures and add other graphics
- change format to jpg or other suitable file types
- remove patient information
- remove defects (scratches, dirt etc)
The fair use of photoshop will also depend on the context in which it is used. If your article is about beam collimation, the cone marks should be left as original. In another context, this may be completely irrelevant.
12. Comment
Photoshop is your 'best friend' if you intend loading images onto the Internet. If you have trouble with any of the steps above, you have a few options.
- Use the reference guide that came with your software.
- Buy a users guide book (eg Photshop for Dummies)
- Use the help menu....very quick and easy
- Search for a tutorial on the Internet.
The last item is very useful. There are innumerable Photoshop tutorials on the Internet including video tutorials.
be patient... photoshop takes time and practice to master
....back to the applied radiography home page here